Install SDK
Get a ready-to-paste snippet for your site, with your public key and placement filled in, and check that your site is connected.
The Install SDK page ("Install the web SDK") gives you the code for one screen and tells you whether your site is talking to Miniwall yet. Use it after you have published a screen. Developers on your team can open it directly from Developers in the sidebar.
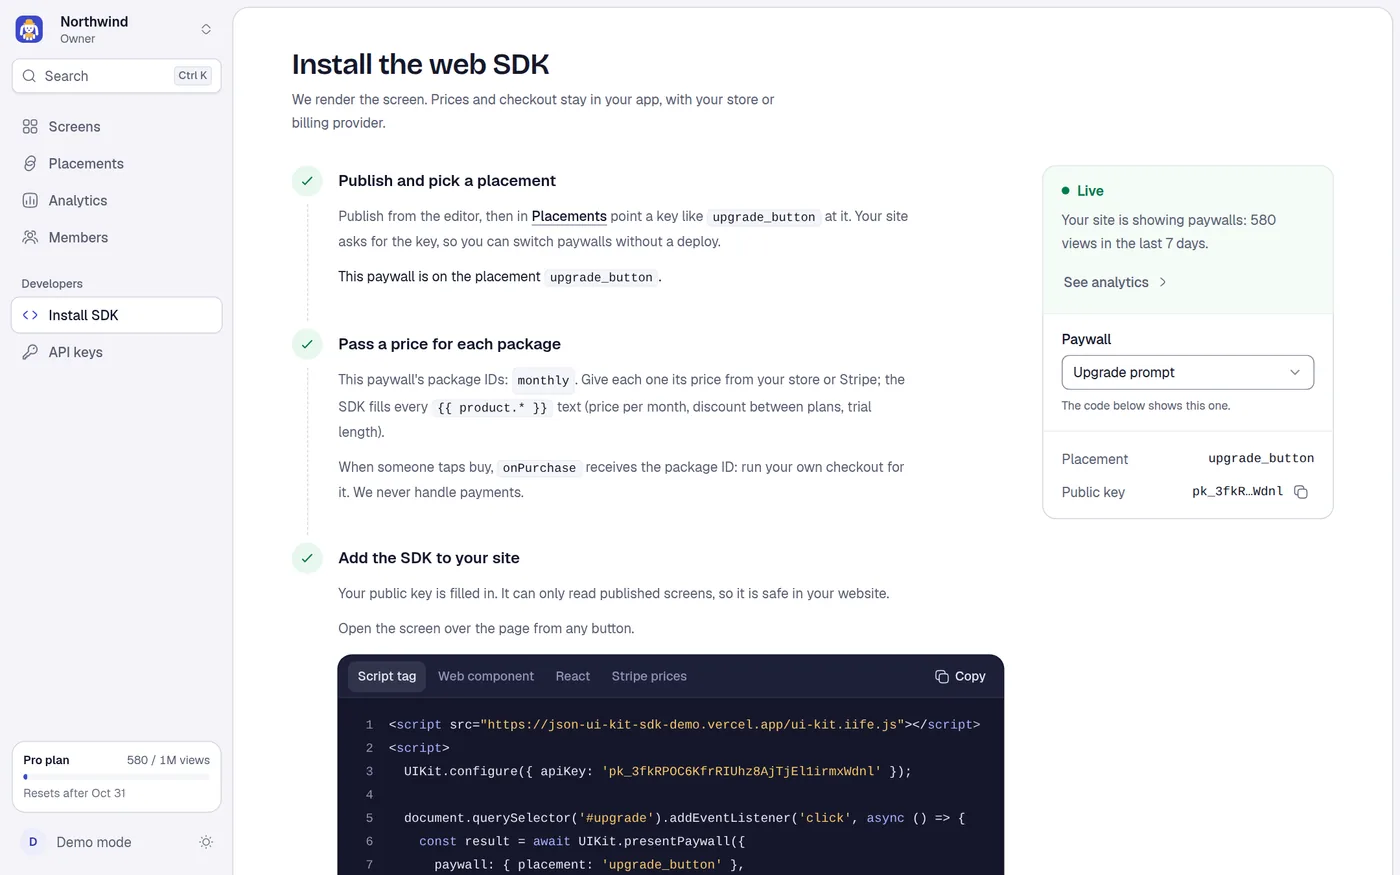
The page says: We render the screen. Prices and checkout stay in your app, with your store or billing provider.
The side panel
On a wide screen, a panel sits to the right of the steps.
| Part | What it shows |
|---|---|
| Status | Checking your site… while it looks. Waiting for your site. until a view arrives, with the hint Once it shows a paywall from a placement, this turns green. Then Live, with Your site is showing paywalls and the number of views in the last 7 days, and a See analytics link. Use Check again to look now. |
| Paywall | A selector listing every screen. Screens not yet published are marked (not published). The snippet below changes to the screen you pick. Starts on the first published screen. |
| Placement | The key of the placement that shows this screen, or None yet. |
| Public key | A shortened copy of your project's public key with a copy button, or None yet. |
The status counts any view in the project from the last 7 days, not only views of the selected screen. The selected screen and the tab you pick are kept in the page address.
Step 1: Publish and pick a placement
Your site asks for a placement key, so you can change the screen later without a deploy. The step ticks when the selected screen is published and has a placement. Notices show what is missing:
| Notice | What to do |
|---|---|
| There is no screen to show yet. Make one first. | Select New screen. |
| name is not published yet, so your site has nothing to show. | Select Open editor and publish. |
| No placement shows name yet; the snippet uses its ID for now. | Select Create a placement. It makes a placement named after the screen (for example upgrade_plans, then _2, _3 if the key exists) and shows this screen. Needs an editor role. |
When a placement exists, the step says This paywall is on the placement and its key. The snippet uses the key. Without a placement the snippet falls back to the screen's ID.
Step 2: Pass a price for each package
This step lists the package IDs of the selected screen, for example monthly and annual. Give each one its price from your store or Stripe. The SDK fills every {{ product.* }} text, such as the price per month, the discount between plans and the trial length. The step ticks when the screen has at least one package.
When a visitor taps buy, onPurchase receives the package ID. Run your own checkout there. Miniwall never handles payments.
Step 3: Add the SDK to your site
If your project has no public key, a notice reads You need a public key for the snippet to work. with Create a public key. Creating a key needs an admin role. Once a key exists, the page says Your public key is filled in. It can only read published screens, so it is safe in your website.
Pick a tab. The line under the code says when to use it. The step ticks when your site is live.
| Tab | When to use it |
|---|---|
| Script tag | Open the screen over the page from any button. |
| Web component | Inline on a page, like a pricing section, with one tag. |
| React | For React and Next.js. Safe with server rendering. |
| Stripe prices | On your server: turn Stripe prices into the products the screen needs. |
Each code block has a copy button.
Script tag
<script src="https://sdk.miniwall.app/ui-kit.iife.js"></script>
<script>
  UIKit.configure({ apiKey: 'pk_...' });

  document.querySelector('#upgrade').addEventListener('click', async () => {
    const result = await UIKit.presentPaywall({
      paywall: { placement: 'upgrade_button' },
      // Prices from your store or billing provider, keyed by package ID.
      products: {
        monthly: { price: 9.99, currency: 'USD', period: 'month' },
        annual: { price: 9.99, currency: 'USD', period: 'year' },
      },
      onPurchase: async ({ packageId }) => {
        // Run your checkout for this package (Stripe, Paddle, your backend...).
        // Return true when paid, false when the user cancelled.
        return startCheckout(packageId);
      },
      // Optional, for Targeting: checked in the browser, never sent to Miniwall.
      attributes: { plan: currentUser.plan },
    });
    console.log(result); // { outcome: 'purchased', packageId } | { outcome: 'closed' } | { outcome: 'skipped', reason }
  });
</script>
Web component
<script src="https://sdk.miniwall.app/ui-kit.iife.js"></script>

<uikit-paywall placement="upgrade_button" api-key="pk_..."></uikit-paywall>

<script>
  const paywall = document.querySelector('uikit-paywall');
  paywall.products = {
    monthly: { price: 9.99, currency: 'USD', period: 'month' },
    annual: { price: 9.99, currency: 'USD', period: 'year' },
  };
  paywall.onPurchase = async ({ packageId }) => startCheckout(packageId);
  paywall.visitorAttributes = { plan: currentUser.plan }; // optional, for Targeting
  paywall.addEventListener('uikit-purchased', (event) => unlockPro(event.detail.packageId));
</script>
React
import { configure } from '@ui-kit/web';
import { Paywall, usePaywall } from '@ui-kit/react';

configure({ apiKey: 'pk_...' });

const products = {
  monthly: { price: 9.99, currency: 'USD', period: 'month' },
  annual: { price: 9.99, currency: 'USD', period: 'year' },
};

// Inline, e.g. on a pricing page (safe with Next.js server rendering)
<Paywall paywall={{ placement: 'upgrade_button' }} products={products} onPurchase={checkout} attributes={{ plan: user.plan }} />

// Over the page, e.g. from an upgrade button
const present = usePaywall({ products });
const result = await present({ paywall: { placement: 'upgrade_button' }, onPurchase: checkout });
The price values in these snippets are examples. Replace them with real prices. Functions such as startCheckout, checkout, unlockPro and currentUser are placeholders for your own code. The full options are in the SDK guide.
Step 4: Let placements show themselves
This step appears only when at least one placement has an automatic trigger in Display, for example after 10 seconds or on exit intent. It tells you how many placements have a rule, lists each key with its rule in words, and gives a snippet with two tabs, Script tag and React.
<script src="https://sdk.miniwall.app/ui-kit.iife.js"></script>
<script>
  UIKit.configure({ apiKey: 'pk_...' });

  // Once, on every page. Each placement shows itself by its rule in Display.
  UIKit.startAutoPlacements({
    products: {
      monthly: { price: 9.99, currency: 'USD', period: 'month' },
      annual: { price: 9.99, currency: 'USD', period: 'year' },
    },
    onPurchase: async ({ packageId }) => startCheckout(packageId),
    onAction: ({ actionId }) => handleAction(actionId),
    onResult: ({ placement, result }) => console.log(placement, result),
  });
</script>
Call startAutoPlacements() once per page. Each placement shows at its moment, one screen per page view. See Auto placements.
Roles
| Action on this page | Role needed |
|---|---|
| View the page and copy snippets | Viewer |
| Create a placement | Editor |
| Create a public key | Admin |
A locked button shows the reason in a tooltip.
Loading and errors
While the page loads, you see grey placeholders in the layout of the real page. If loading fails, an error with a Try again button appears.