Layers
Use the Layers panel to see the structure of your screen, select, rename, search, add, copy, delete and reorder layers.
The Layers panel shows your screen as a tree. Use it when clicking on the canvas is awkward: to select something hidden behind another layer, to reorder items, to rename layers so you can find them later, or to add a layer exactly where you want it.
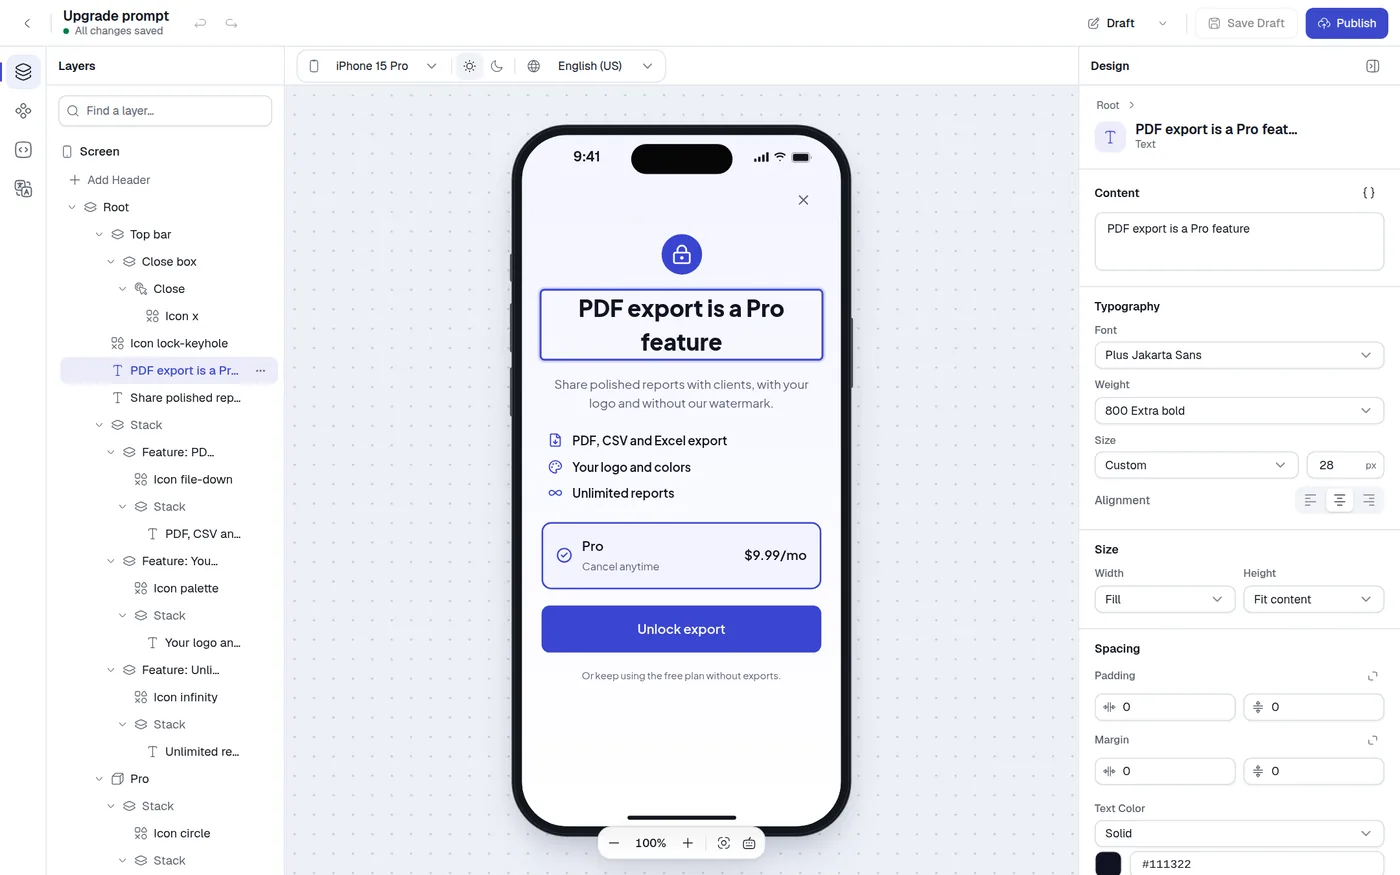
Open it with the Layers button on the left rail, or press 1.
Read the tree
Each row is one layer. A row shows an expand arrow (for layers with children), an icon for the kind of layer, and its name. The name is what you typed, or the kind of layer if you never named it. Unnamed plain stacks are dimmed so named layers stand out.
The tree starts with:
- Screen, the whole screen. Select it to edit the background and brand colors.
- Add Header, or the Header row if you added one.
- The root stack, which holds the content.
- Add Footer, or the Footer row if you added one.
The header, root stack and footer sit one level in from Screen. You cannot rename, move or duplicate these three, and you cannot delete the root stack. The header and footer have Delete in their … menu. See Header and footer.
Click an arrow to expand or collapse a layer. When you select a layer on the canvas, Layers opens all of its parents and scrolls to it.
What Layers hides
Layers shows the layers you can work with and hides plumbing:
- A wrapper such as Button, Package, Purchase button, Header, Footer or Answer has one inner stack that carries its look. Layers skips that stack and lists the wrapper's children directly. The design panel for the wrapper includes the stack's controls.
- The invisible tab control marker inside each tab is hidden.
- A Switch has an empty placeholder Tab Control stack that never shows, so Layers hides it.
- The content of a Tabs layer is shown one tab at a time. See Tabs in Layers.
Select layers
Click a row to select it. The canvas outlines the layer and the design panel shows its settings.
- Shift-click, ⌘-click or Ctrl-click a row to add it to the selection or remove it.
- With several layers selected, edits to look settings in the design panel (size, spacing, fill, border, shadow, font, color, alignment, image fit) apply to every selected layer of the same kind as the one shown. A note at the top of the panel says how many. Text, IDs, names, actions and links never spread this way, so two plans cannot end up with the same package ID.
- Press Esc to select the parent of the selected layer.
Find a layer
The search box Find a layer… stays at the top of the panel while the tree scrolls. It matches:
- the layer name,
- the kind of layer, with underscores shown as spaces (for example
purchase button), and - the text of the layer in the default language.
Matches and their parents stay visible, matches are shown in bold, and collapsed branches open while you search. If nothing matches, you see No layer matches followed by your search. Press Esc in the box or click Clear search to leave search. While searching, the Screen row and the Add Header and Add Footer buttons are hidden.
Rename a layer
Give important layers short names. Names appear in Layers, in the design panel header, in the breadcrumb, and in publish messages such as N text(s) are empty in the default language: "Price".
Rename in any of these ways:
- Double-click the name.
- Open the … menu and choose Rename.
- Select the row and press Enter.
Type the new name and press Enter to keep it. Press Esc to discard, or click away to keep it. An empty name is ignored.
You can rename list entries only. The header, root stack, footer and a wrapper's inner stack cannot be renamed. Tabs are renamed from their own picker.
Add a layer
Hover a row that can hold children and click its + button (Add inside plus the name). A menu lists the same five groups as the Components panel: Basics, Purchase, Interactive, Questions and Content. Pick a component and it is added as the last child, and selected.
The menu only offers what is allowed there. If nothing is allowed, it says Nothing can go inside this layer. The rules are listed in Where components can go.
You can also drag a tile from Components onto the canvas, or paste a copied layer.
A layer with a + button must own a list of children: a stack, header, footer, package, purchase button, button, answer, question, or a carousel page. Text, images, icons, text fields, timelines and countdowns have no +. A timeline grows by duplicating a row, and a carousel by Add page in its design panel.
The row menu
Hover a row to see its … menu (Actions for plus the name).
| Item | What it does | When it is available |
|---|---|---|
| Rename | Edits the name inline. | List entries, in Draft. |
| Duplicate | Makes a copy right after the layer. | List entries, in Draft. |
| Copy | Copies the layer to the editor clipboard. | Always, even on the published version. |
| Paste | Pastes the copied layer into this row (if it can hold children) or after it. | In Draft, when something is copied and the target accepts it. |
| Delete | Removes the layer and everything inside it. | List entries, in Draft. The header and footer can be deleted from their row. |
What copies and pastes:
- Everything inside the layer comes with it, and so do its translations in every language.
- Pasted layers get new internal IDs.
- A pasted package keeps its package ID with a suffix such as
_2if the ID is already used, and it is no longer selected by default. A pasted question gets a unique field ID the same way. - You can copy from the published version and paste into your draft after switching back to Draft.
If a paste with ⌘V (Ctrl+V) or a drop from Components is not allowed, you get a message that says why, for example Answers belong inside a question. The Paste item in the row menu simply does nothing when the target does not accept the layer.
Undo brings back anything you delete.
Reorder and move layers
Hover a row to reveal the grip on its left, then drag it.
- Drop on the thin strip at the top of a row to place the layer before that row, in the same parent.
- Drop on the body of a row that can hold children to move the layer inside it, as the last child.
The target highlights while you drag, and rows that cannot accept the layer do not highlight. You must drag at least a few pixels to start, so a plain click never moves anything. Dragging is turned off on the published version.
You can move layers between the header, the root stack and the footer, as long as the target accepts them.
Timeline rows cannot be dragged. Everything else in a list, including carousel pages, can.
Tabs in Layers
A Tabs layer works differently, because only one tab exists on screen at a time. Under the row you see a single picker, Tab shown in Layers, and the layers of the chosen tab below it.
| Control | What it does |
|---|---|
| The picker | Chooses which tab's content Layers and the canvas show. It writes the same Active Tab setting the design panel and the canvas use, so all three stay in step. |
| Add tab (last item in the picker) | Adds a tab and its button, and switches to it. Not offered for a Switch, which always has exactly two tabs. |
| Add to this tab (the + button) | Adds a component to the content of the chosen tab. |
| Tab actions, Rename | Renames the chosen tab. |
| Tab actions, Delete | Deletes the chosen tab and its button. Disabled while only one tab is left. |
Tabs cannot be duplicated, copied or pasted from the picker. Copy the whole Tabs layer instead.
Keyboard
Click a row so the panel has focus, then:
| Key | What it does |
|---|---|
| Up and Down | Move to the previous or next visible row and select it. |
| Right | Opens a closed layer, or moves into its first child. |
| Left | Closes an open layer, or moves to the parent. |
| Enter | Starts renaming the selected layer. |
| Delete or Backspace | Deletes the selected layers. |
| ⌘D (Ctrl+D) | Duplicates the selected layers. |
| ⌘C and ⌘V (Ctrl+C and Ctrl+V) | Copy, and paste into the selected stack or after the selected layer. |
| ⌥⌘C and ⌥⌘V (Alt+Ctrl+C and Alt+Ctrl+V) | Copy a layer's style, and paste it on layers of the same kind. |
| Esc | Selects the parent. |
The editor-wide shortcuts, including 1 to 4 for panels, are on Keyboard shortcuts. They also work from the canvas. They are ignored while you type in a field or work in a menu or dialog.
When a layer cannot be deleted or duplicated on its own, a message tells you to select its parent. For example, the inner stack of a button is part of the button, and the header and footer are removed from their row in Layers.
Copy and paste style
Copy a layer's look and apply it to others, without touching their content. Select a layer, press ⌥⌘C, then select layers of the same kind and press ⌥⌘V. Pasting on a different kind shows a message such as That style is from a text; paste it on a text.
Style means size, layout, spacing, padding, margin, fill, border, shape, shadow, font, size, weight, alignment, color, image fit, mask, color overlay and icon background. For wrappers, the style of the inner stack travels too. Text, translations, IDs, actions, links, images, children and the When selected look are never copied.
No hide or lock
Layers does not have hide or lock toggles. To remove something from the live screen, delete it. To keep a version you might want back, use Undo or Version history.
Read-only modes
On the published version, and for viewers, you can still select rows and copy layers, but add, rename, duplicate, paste, delete and drag are all off. The editor also refuses edits at the data level, so nothing can slip through.